Showing posts with label 12 months of displays. Show all posts

Friday, May 1, 2015

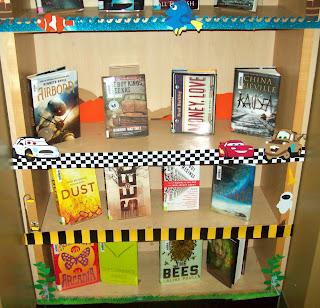
May: Pixar Themed Display

We were very lucky to have Nathan Stanton, Story Supervisor for Pixar, come to our school to give a talk about the work he has done at Pixar. He was fascinating, showing clips from Monsters Inc., Cars 2, The Nightmare Before Christmas, Finding Nemo, A Bug's Life and more! Inspired by his visit I created a Pixar themed display.


As you can image this took a long time to create. I separated out each character into layers and cut the pieces out using the Silhouette Cameo, then I glued all the pieces together.


For the Up! border I found some clip art of patches and arranged them into two rows.
For the Monster's Inc border I used the flower symbol in Photoshop and created flowers in various sizes and colors to mimic Boo's door.

For the birds at the top of the display I created three different type of eyes to give the birds different looks and when I taped them to the bookshelf I varied the different bird designs to make them look as unique as possible.

Behind the cars shelf I created a desert scene using two shades of brown and one of orange. I made Mater and McQueen using the Silhouette Cameo and the layering as I mentioned above, I also included the car that was inspired by Nathan Stanton.

At the very bottom of the display I added Wall-E and A Bug's Life, cutting out grass and creating a caution border as seen on Wall-E.

Here are the desert files if you want to trace and cut them out or use them with the Silhouette Cameo:
 Orange desert files:


Dark Brown Desert files:


Army Men file:
 
Mine Bird files:


Mine Birds Wooden Post files:


Wednesday, April 15, 2015

April: Black Lives Matter Display


Our students are discussing and embracing the Black Lives Matter movement. One of our teachers asked if the library could create a display around this topic, showcasing the books that we have on these issues.

I created a very simple display, using black and red as the display colors (you can find information about the movement here).

I cut out text using the Silhouette Cameo, if you look closely you will see that the text contains several names associated with this movement, I did not create this text, you can find it here.


I completed the display with several photos I found online representing the movement.

Sunday, April 12, 2015

April: Earth Day Tree Display

For our Earth Day display this year I created a tree that spans across our bookcase. I created the trunk of the tree by laying full sheets of construction paper on the display and tracing a trunk design, cutting it out piece by piece so it matched. I made the trunk months before the display was put up, so I numbered each piece and took a picture of it up, to use as a guide when it was time to put up the actual display.


For the leaves I created several different variations and cut them out using the Silhouette Cameo. It took a lot of time to cut out all these leaves, in various colors, so I began several months ahead of time and did a sheet of leaves whenever I had a bit of time.

For the books I pulled all out Earth Day themed books to complete the display.


Monday, March 2, 2015

March: Dive Into Reading Display

During the month of march my school has a two week Interim. The students all go on exciting trips around the world as well as participating in unique activities. This year a few of our trips focused on water: scuba diving, surfing...... so the idea for this display was easy! Dive into reading!

I cut out the waves, fish and title using the Silhouette Cameo. Because Interim is all about the activities that the students will be experiencing we like to make a display with books on each topic. I used the Silhouette Cameo to print out the name of each excursion on a fish and then cut out that fish. I place each fish under the corresponding book on the display.
We had lots of fish! The display turned out really cute. You could easily take this same idea and just leave the fish blank!

Saturday, February 14, 2015

February: Blind Date With A Books, Take Three! Display

It's that time of year again, Blind Date With A Book! Everyone's favorite interactive display! This year I chose to do a flower theme instead of a heart theme as in the years before. With our new Silhouette Cameo I was able to cut out dozens of 3D flowers, making this display gorgeous!!
Each book was wrapped in either a metallic purple or metallic green wrapping paper. I cut out vines and flowers to put on the books, along with either a leaf or flower that gave a brief description of the book, genre, theme.

As with the last two attempts at this display I used similar signage to explain the display and how it worked. I numbered the back of each wrapped book and provided a signout sheet for students to checkout the books.
You can read more detailed instructions  in my first Blind Date post
Hope you liked this version of the display!


Monday, February 2, 2015

February: African American History Timeline Display


In honor of African-American History Month I created a unique timeline display. I saw an idea on Pinterest from a University library that had posted a timeline in their display case, for African-American History Month. I searched all over and was unable to find the timeline they had used. I created my own timeline template in Photoshop and I used facts, years and photos found on InfoPlease African-American History Timeline, History.com Black History Month, US Forest Services Timeline of Events in African American History, and NPR Black History Month Timeline.


The timeline covers events from 1694-2009. Each shelf covered six events in history, with the year it happened, a short summary of events and a picture of the event or person. For the books on display for each shelf, I chose books that corresponded to the events represented on that shelf.


For the title at the top of the display I cut the letters out using our Silhouette Cameo and glued them onto black strips of paper.

Here is the file, you can trace it in Silhouette Studio.


Monday, January 12, 2015

January: Puzzled Over What To Read Next? Display

Puzzled over what to read next? Check out our new library display!

For our first three displays of the new year we focused on variations of the classic "If you liked this, you'll love this" display. For our Puzzled display I used our Silhouette Cameo to cut out dozens of puzzle pieces and then I taped the pieces together forming the border of the display. For each Matching set of books I taped a puzzle piece of a matching color on the covers.

I including this sign on the display letting the students know what the display was all about.
I found some puzzle piece letters online and made the signage for the top of the display.

I used Goodreads for help finding books that went well together. That's all there was to it!


Tuesday, December 9, 2014

December: Library Scrabble Display


I came up with an idea to turn the game of Scrabble into an interactive library display. I wasn't sure if the display would be popular with my students but it turned out to be a total hit! Here is all the details so you can create a display of your own!

Before I explain each step, let me give you an overview of the scrabble "game" display. Each book was wrapped in a paper bag and had a scrabble tile taped to the front of the bag. Because the books were completely covered I wanted to give a couple of clues as to what the book was in the bag, in case a student wanted to check one out. I chose to use the first letter of the book title as the scrabble tile letter. For the point value of the scrabble letter I color coded it to represent one of 10 genres. I then created the different genres out of scrabble tiles, in their "color" and used those as decor. Any student could come up to the display, rearrange the scrabble tiles (books) into a word and then they would write that word on a clipboard that I provided next to the display. If the word had not already been used that day they got a cookie. The highest scoring word each day won a book. You could checkout one of the scrabble books, I provided numbers on the back of each scrabble book and a sign out sheet to allow students to check out the books. If you checked out a book you got to choose the next scrabble book that went on the display, and you got first dibs at spelling a new word, thus having an advantage and the best chance of getting the highest score that day.

How To:

Step 1: I complied a list of letters that could be used to spell the most amount of words. I repeated some letters, I tried to get a list of at least 34 books to begin my display and to have a back up of books (this will come in handy later). I then went through the stacks (I chose to only use fiction books) and found books that began with each letter.

Step 2: Using a guide I found online, that gave me the point value for each letter, I made up "Scrabble tiles" for each letter. Here are the ones I used, please feel free to use them:
You will notice the point value is color coded to match our 10 genres.

Step 3: I made up decor to allow students to easily identify the genres:
Step 4: I cut out the scrabble tiles and taped them to brown paper bags. I wrote a number on the back of each bag.

Step 5: I wrote the barcode of the book and the number on the bag that matched the book, on a spreadsheet, I then put the book in the bag.I put a signout sheet on the reference desk for students to write the number on the bag when checking out the book.


Step 6: I made up signs explaining how to play the game and how you would get a cookie for playing.


Step 7: I hung a sheet next to the display for students to write their words on:
Step 8: For the top of the display I made a Library Scrabble sign:


That's it! The display was a lot of fun, try it at your library!